Tuesday, April 28, 2015

April Club Kit From La-La Land Crafts

Hello dear friends!

Today several additional members of the La-La Land Crafts design team are showcasing their cards made with the April Club Kit, and I'm one of those people.

I made two cards:


Here Marci is colored with the following Copics markers:
Skin: E04, E11, E21, E00, E000, E0000 + RV21
Hair: N3, N5, N7, 100
Outfit: E79, E77, E74, E71, E70
           RV95, RV32, RV21
Flowers: R85, R83, R81, R11
               RV95, RV32, RV21
               G99, G94, YG00


For coloring Marci on the second card, I used these Copics:
Skin: E04, E11, E21, E00, E000, E0000 + RV21
Hair: E11, E15, E18
Outfit: G12, G00, G000, G0000
Flowers: YG99, YG97, YG03
               Y28, Y26, Y23
                E74, E71, E70

You may have a look at the preview of what's inside the product kit for April:


I LOVE the filigree flowers and those shabby floral dies! And the whole kit is just cute as usual.


Thank you for visiting!


Hugs,
Alexandra

Tuesday, April 21, 2015

SC Girl Power - Little Loves - LDRS

Hello dear friends!

I'm here with a quick share of a card I made for the LDRS DT, using the sweet 'Little Loves' rubber stamp from the "Girl Power" collection by Saturated Canary. She's not available in digi, but only as a rubber from the Little Darling Rubber Stamps.


I colored the stamped image with the following Copics markers:
Skin: E04, E11, E1, E0, E0000 + RV21
Hair: N7, N5, N3 + 100
Outfit: E15, Y38, Y15, Y13


I also used one of the newest LDRS dies - Dewdrop Circle.


Enjoy your day and thanks for watching!

Hugs,
Alexandra

Friday, April 17, 2015

New Release - April 2015 - La-La Land Crafts

Good evening dear friends!

Today is the last day of the new release showcase and my card will feature the following La-La Land Crafts products:
Stamp: Groovy Marci

Dies:
Winged Heart
Arched Window
Tall Birdhouses
Love to Garden
Topiary
Yin Yang Border
Groovy Border
Groovy Elements (the flowers)


I've colored Marci with Copics:
Skin: E04, E11, E21, E00, E000, E0000 + RV21
Hair: N7, N5, N3 + 100
Outfit: BG09, BG07, BG05, BG01, BG000
            YG67, YG63, G24, G21, YG00
            YR24, Y26, Y21
Belt + Shoes: E77, E74, E71, E70
Flowers: E17, YR16, YR14, YR12
Tambourine: E59, E57, E55, E53
                      C5, C2
                      R89, R24

Here are the details:


There's also a Groovy Luka to make a company for Marci! You can have a look at him and all of the rest of the new products here.


That's all for now.
Have a lovely weekend!


Hugs,
Alexandra


Thursday, April 16, 2015

New Release - April 2015 - La-La Land Crafts

Hello friends!

If you are a follower of the La-La Land Crafts Inspiration Blog you must have already seen the new dies and stamps from the April 2015 release.

The card I want to share with you today features the following La-La Land Crafts products:
StampShy Marci

Dies:
Arched Window
Heart Scroll Corners
Diamonds Lattice Border
Open Heart Doily Border


Marci is colored with these Copics:
Skin: E04, E11, E21, E00, E000, E0000 + RV21
Hair: E51, E53, E55, E57
Outfit: G12, G00, G000, G0000
            W5, W3, W1, W0

You can have a look at the details at the following pictures:


Here is the whole new release:


I'm sure you must have several of the dies or stamps for your collection, right? :)

Have a nice day you people. I hope you like my card.


Hugs,
Alexandra

Wednesday, April 15, 2015

I Am Roses April Challenge

Hello lovelies!

In the middle of every month we start a new challenge at the I Am Roses and encourage you to enter your creations and win awesome prizes from the I Am Roses company. The theme is always the same and it's the easiest ever - "Anything Goes".

My card for the April Challenge features the stamp from Saturated Canary - "Owl Always Love You" and of course a bunch of different flowers from I Am Roses Thailand (all the links at the bottom of the post).


 The image is colored with the Copics markers:
Skin: E04, E11, E21, E00, E0000 + RV21
Hair: E11, E15, E18
Outfit: R89, R85, R83, R81 + R11
            RV99, RV95, RV93, RV91
            E77, E74, E71, E70
         

Here are the close-up shots:


Here are the rules of the challenge:
Contest runs April 15th - May 8th (Ends 11:55pm PST)
Theme: "Anything Goes"
Minimum (2) I Am Roses Products
One project submission per participant
One winner will be chosen
Participants will upload their project to their blog or forum, Label it “MAR IAR Challenge”
Participants will add a direct link to their project using the InLinkz tool provided. (*if you are unable to use the tool, leave a comment to this blog post and leave a direct link to your project)
Must Subscribe/or be a Follower of the IAR Challenge Blog
Winner will be announced alongside the next NEW monthly challenge on the 15th

I used the following flowers on my card:
White Mulberry Paper Flowers
Mini White Paper Flowers

I hope you like this card and will visit I Am Roses for some shopping:


Thanks for visiting me today!


Hugs,
Alexandra

Friday, April 10, 2015

Anything Goes with Butterflies @ La-La Land Crafts

Hello crafters!

Our current theme at the La-La Land Crafts Inspiration blog is "Anything Goes with Butterflies and/or Buttons", I chose to use the butterflies.

I used the stamp "Heart Key Marci" and the following dies:
Heart Header Border  ((From the December 2014 Club Kit))


Marci is colored with Copics:
Skin: E04, E11, E21, E00, E0000 + R20
Hair: E11, E15, E18
Reds: T5, E09, E07, R24
Dress: R85, R83, R81, R11

Greys: W5, W3, W1, W0

Here are the close-ups:


Make sure to have a look at the rest of the cards the team made. Visit this link.


Hugs,
Alexandra

A card for the I Am Roses DT

Hello again friends!

It's my second and still not the last post for today :)
I'm sharing a card made for the I Am Roses Design Team. Don't forget that every month I Am Roses is having an "Anything Goes" challenge and we are waiting for your submissions using the quality and affordable products from I Am Roses.

** All the links to the flowers may be found at the bottom of this post.

I used a digital stamp from the PPinky Dolls. Once it was offered as a Freebie in the Ppinkydolls Facebook group.


The image was colored with the following Copic markers:
Skin: E04, E11, E21, E00, E0000 + RV21
Hair: E11, E15, E18
Blues: BV08, BV04, BV02, BV00
Greens: G99, G94, G24, G21, G000
Puppy: W5, W3, W1

Some more of the details:


I think I Am Roses flowers may always make even a simple card look beautiful.


Thanks for visiting me today!!!
In a couple of hours my card for the La-La Land Crafts will be up on the blog so please do come back to have a look!

And here are the links to the flowers and leaves from I Am Roses which I used for creating this card:
Mixed Purple Green Color Paper Roses
Plum Curly Paper flowers
Small Pastel Rainbow Paper Flowers
Cream Puffy Semi Rose Buds

Groovin' - Dollhouse Collection from the LDRS

Hello dear friends!!!

I haven't been around lately. We have been very busy with the house moving and there are so many things yet to do, that my head is going to explode!

Anyway, I wanted to write a quick post and share a card I made for the LDRS DT with one of the images from the Dollhouse Collection. This one is called "Groovin'" and I really liked coloring it, especially the hair.


Here are the Copics I used:
Skin: E04, E11, E21, E00, E000, E0000 + RV21
Hair: BV08, BV13, BV00, Y13 + 100
Pants: BG09, BG07, BG05, BG02, BG00
Shirt: V09, V06, V04, V01

The two tags on the right side may be pulled out and reveal two sentiments from the "Enchanted Wishes" stamp set:


Thanks for watching and have a nice weekend!


Hugs,
Alexandra

Monday, April 6, 2015

Simple Photo Frame – Tutorial

Hello everyone!

At the C.C.Designs blog Monday means a tutorial, so today it’s my turn to share with you some technique, or hint or anything else crafty.


I decided to write quick instructions on creating a simple frame for a 3.5” X 5 1/8” (or 9cm X 13cm) photo. The final result will look like this (yes, all the way CAS):


To start, you’ll need 3 pieces of cardstock measuring 4.5” X 6 1/8”.


Using any circle punch (or even a die) from those you have, punch a half circle on top of one of the pieces (this will make the process of taking the photo out of the frame easier):


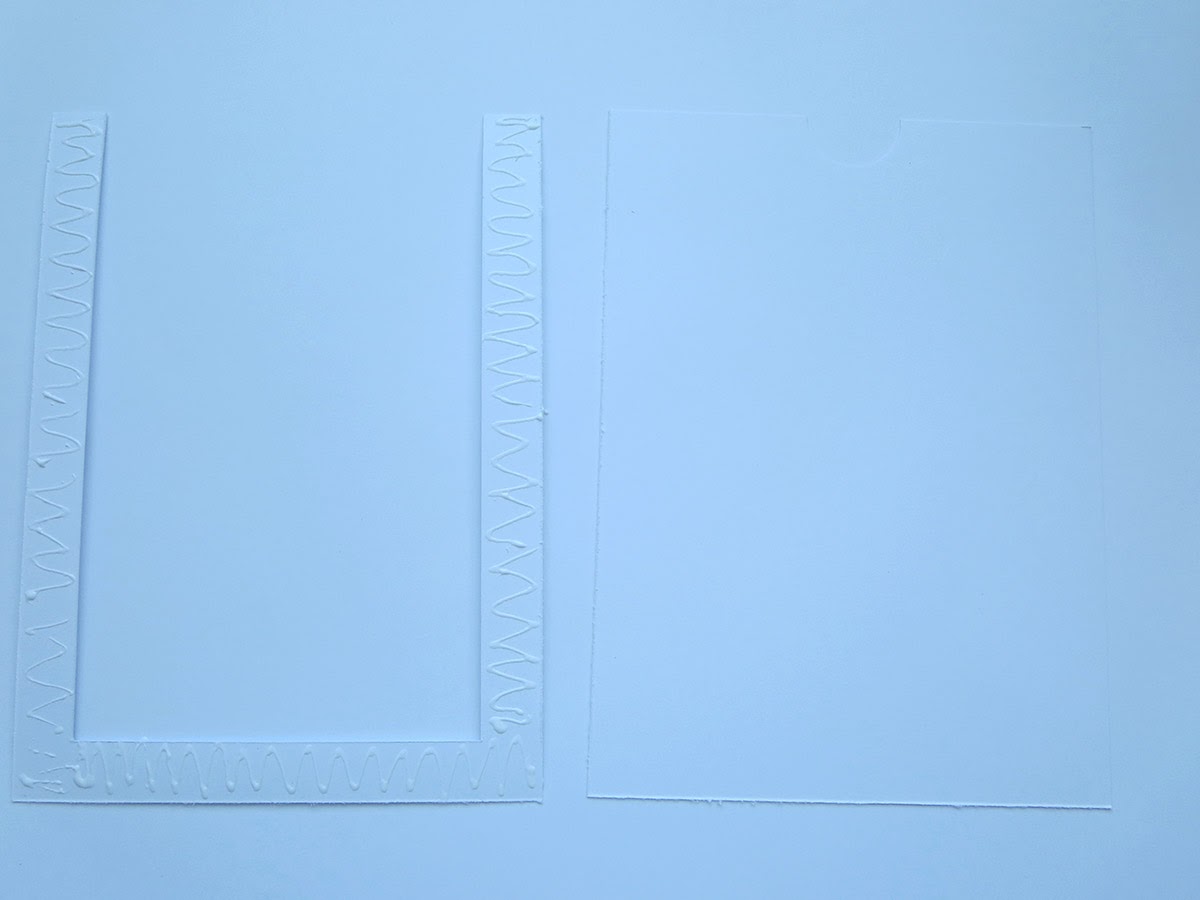
One the second piece draw a frame as shown below:


And on the third draw the guide lines with the measurements shown below:


Cut out the inside of the third piece:


Apply some wet glue on the back of it and glue down to the third piece of cardstock (the one with the half circle). Pay attention to the sides, align them properly. 


Now we'll need an acetate sheet measuring 5 3/4" x 3 3/4". Apply 1/8" score tape on the three sides of the acetate as shown below:


Remove the tape backing and attach on top of the frame as follows:


Use the same 1/8" score tape again and apply it to all the 4 top sides of the acetate sheet (once it's already glues to the frame base):


Cut out the inside of the third 4.5” X 6 1/8” cardstock:


Before gluing it to the frame base, remove the tape backing from the acetate:


Apply wet glue on the sides and glue the third cardstock on top, aligning the sides properly:


Since we've glued several layers of paper together and sometimes the knives in our trimmers are not very sharp, I recommend using a sanding block for taking care of any uneven or a bit fluffy edges:


The most of the work is done now. Prepare a piece of a designer paper of your choice, measuring 4 3/8" X 6":


Draw the frame on the back side of the designer paper as shown and cut the inside out:


Glue the designer paper on top of the frame and then you are good to embellish the rest of it to your liking. Now it will be also good to decide how you want to position the picture inside the frame (vertically or horizontally).


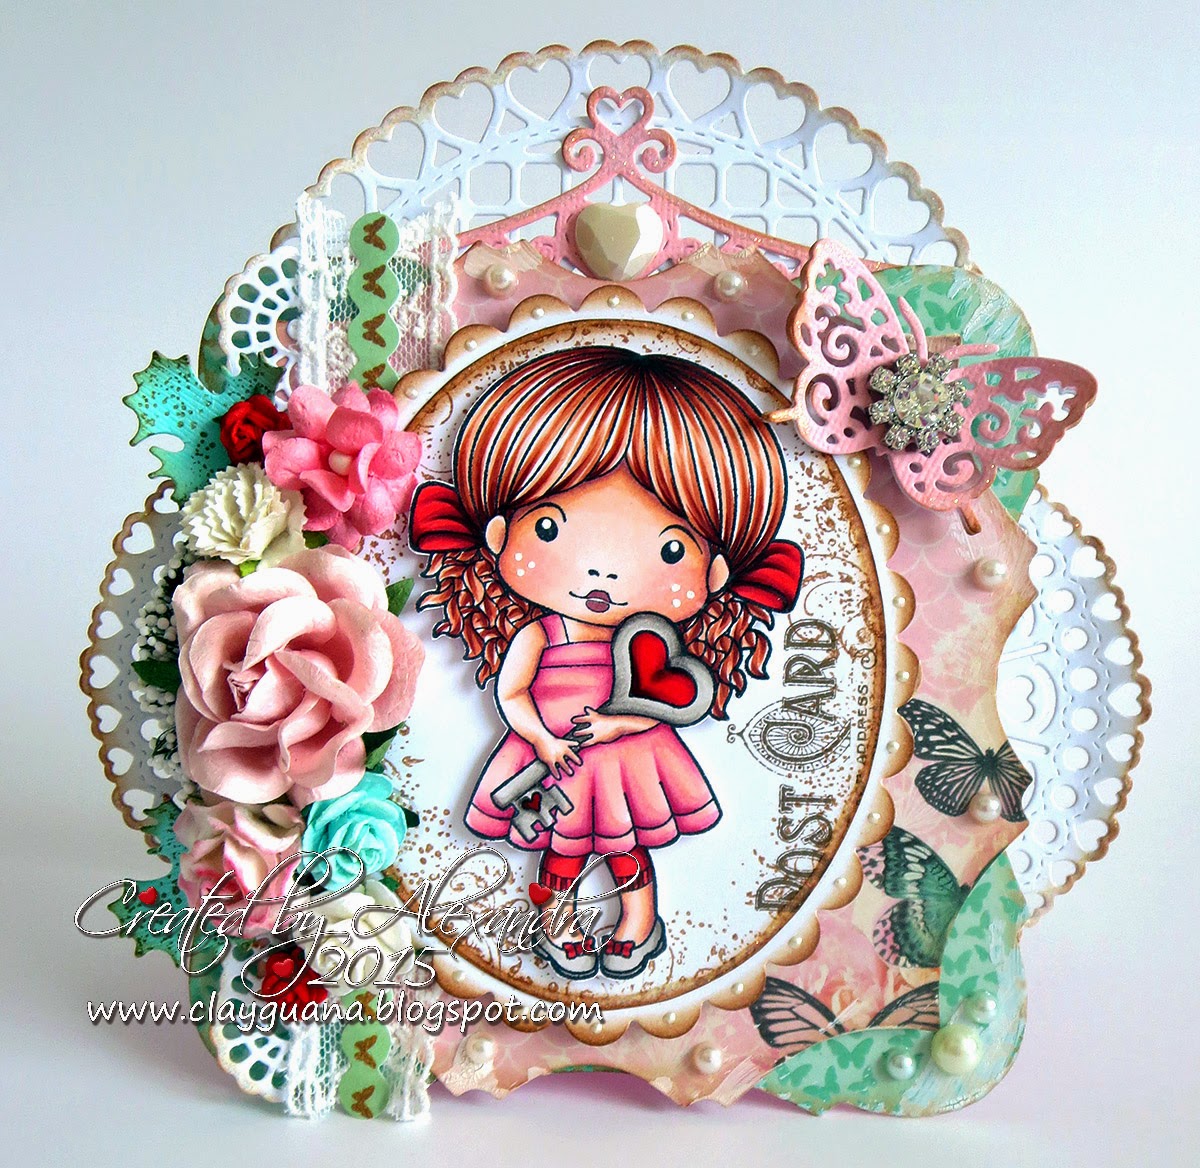
I used the stamp from the C.C.Designs recent (April 2015) release, called "Rose With Balloon" and the accompanying outline die (which comes with the cutest little balloons as well). To make the balloons thicker I glued two layers together and to match the colors on the stamp, I used the same Copics and colored them both:


Rose is colored with Copics:
Skin: E04, E11, E21, E00, E0000 + RV21
Hair: E11, E15, E18
Skirt: E79, E77, E74, E71, E70
Shirt: RV69, RV66, RV55
Balloon: R35, R32, R30


And here is the result again:


The sentiment is from the new set by Amy R - HB2U.
I hope you'll find this tutorial useful.

PS. - I took a picture of a girl from here.


Thanks for visiting!


Hugs,
Alexandra